Search This Blog

Friday, September 25, 2020

Pushing a react native app to playstore

Your app build.gradle will have information about the debug or release apk you will clreate.
check the proguard rules in case you get errors while creating the release app via the
./gradlew assembleRelease or ./gradlew bundleRelease 

Bundle release will create .aab file which google likes and will create architecture specific builds.. 
so that the google android platform identifies on run time, what kind of device is requesting the apk 
and it pushed only that build , it reduces the over all size to 20 percent of actual size.

If your apk size is 30mb and you use enable architecture specific build in proguard rules 

 */
def enableSeparateBuildPerCPUArchitecture = false // if you set true you will get 4 different builds for different architectures... either use this 
or make the bundle of release and let google decide which build to push .. 

/**
 * Run Proguard to shrink the Java bytecode in release builds.
 */
def enableProguardInReleaseBuilds = true   // if u use this, you might hit the class not found errors on the logcat console while doing adb logcat .. 

you will have to change pro guard rules to skip  those files for which you are getting class not found errors in release apks .. or crashes.. 

Every release you make to your exisiting app should have the bundle version code and version number greater 
than the older artifact, else it will be shadowed and new devices will never get your updated.

  versionCode 3434
        versionName "1.5"

Also let google manage your keys... signing keys ... please dont confuse sha1 fingerprints with signing keys... 
Your sha1 fingerprints are used to  restrict .. google maps api key access as well as firebase api key restrictions... 


Thursday, September 17, 2020

the fat arrow magic in React

Well this confuses a lot of people when it comes to updating states in react 
components as well as referring to local variables or calling the main components functions.

To capture events from current components and pass the values to state
you can use the following.

passing input values via onchange handlers and to set them to state you can use fat arrow
i love fat arrow because you dont have to worry about this.value everywhere..

<input onChange = {()=> this.componentFuncttion(e)>

componentFunction = (e)=>this.setState({stateVariable:e.target.value});

Beauty here is this above refers to the main component this and the valuesis passed to the state..


Another beautiful use of fat arrow I have seen is that ... you don't need to pass variables inside the
function and you can directly refer to the variables which are above the scope of the fat arrow... 

but make sure if the structure is like below.. than fat arrow will refer to the closest _this and not the parent this.


CoolComponent extends React.component {

constructor(){

}
var a = 10;
function getData(a){

var a = 0 ;

const input = <input onChange={e=>this.a=1}/>
//now this refers to the closest a =0 which
}

console.log(' value of a is' + getData(a));// will print 1
console.log('value of a is + a) //will print 10 


}

Wednesday, September 9, 2020

React hooks

Hooks are basically used in functional components to introduce core
react functionality .. e.g useEffect can call a function once or on a value chang e
useEffect(()=>
{

}
,[what ever value you want to fire this effect on change]);

useState we can use component like state inside the functional components.
they are a life savers when you want to maintain state in functional components.. 
e.g const [ variable, function ]  = useState(null)
Now this will work like a normal state .function .. its awesome..
you can use useRef also to create references... 

Tuesday, September 1, 2020

react native axios/fetch fails

If your requests are going as network errors for whatever you do and not able to 
get it working on RN >60

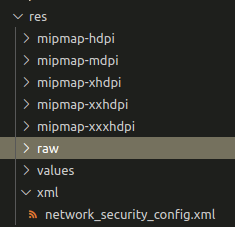
Try to tell android manifest that you need a network config.


android:networkSecurityConfig="@xml/network_security_config"

Also create the xml and raw folder in resource folder of app and add the
public key of your site to the raw folder with out the extension . .
yoursite.cer should be specified as .. @raw/yoursite in your network config.


<?xml version="1.0" encoding="utf-8"?>
<network-security-config>
    <domain-config cleartextTrafficPermitted="true">
  
           <domain includeSubdomains="true">yoursite address</domain>
   

        <trust-anchors>
            <certificates src="system" />
            <certificates src="user" />
 
       
            <certificates src="@raw/certificatefilenamewithoutextension"/>
        </trust-anchors>
    </domain-config>
</network-security-config>

Sunday, August 9, 2020

React Native common errors

Task :app:transformClassesAndResourcesWithR8ForRelease FAILED R8: Program type already present: io.invertase.firebase.BuildConfig

Check the package.json and remove  extra react native packages for firebase.

Could be possible that while trying out firebase integration you have installed multiple versions via npm install.

Error 2
This app is not authorized to use Firebase Authentication.Please verify that the correct package name and SHA-1 are configured in the Firebase Console

You need to have the SHA1 of your debug keystore if you are doing testing in debug mode.
Even if you have configured to use Google play signing , atleast for debug you need a seperate key.

//cd android/app
//keytool -list -v -keystore debug.keystore  -alias android  

password will  most probably be android.

Copy this fingerprint from the debug keystore to your firebase console and test your app.

While moving to prod, copy the sha1 from google play console and update it in the firebase console.


Monday, July 27, 2020

Update react native app on playstore

Open the build.gradle in the android app folder of your react native app.

Change version code and version no 
versionCode 2
versionName "1.1"
}

Now ./gradlew bundleRelease and make a new release in the play console.

Friday, July 17, 2020

Build a React Native app and use WebView

In vscode you can download react native cli 
react-native run-android // make sure your android device is connected..via usb

emulator will be slow and i didnt like it.. on android studio .. it was crawling..
also you will need sdk >28 to make react-native work else it wasgiving licenses error..
finally i decided to use physical device.. 

enable the usb developer options 

To enable physical device make sure you can see it in 
$adb devices ... your phone should be visible there...

Now generate a react app with the starter and it will ask
for the perission to install the app on the phone .. just accept it. 

If you need icons for your app you can search for vector images which
will act as logo and generate app icons from below.

To push to playstore you need to put keystore and password in the build.gradle..

to release the apk you will do  ./gradle assemblerelease.. 

Refer below doc to make a release config in the build.gradle.

make sure react-native start server is running while you try to assemble the release.. 
if allis well you will getthe final apk which you canpush to playstore..

I created a simple webview and included it in the app , i was loading my site from remote..


Final webview that i loaded in my starter app 

import { ActivityIndicator } from "react-native";
import { StatusBar } from "expo-status-bar";
import React, { Component } from "react";
import WebView from "react-native-webview";
import { StyleSheet, Text, View } from "react-native";

export default class App extends Component {
constructor(props) {
super(props);
this.state = { visible: true };
}

hideSpinner = () => {
this.setState({ visible: false });
};
showSpinner = () => {
this.setState({ visible: true });
};

render() {
return (
<View style={styles.container}>
<WebView
source={{ uri: "https://site.in" }}
onLoadStart={() => this.showSpinner()}
onLoad={() => this.hideSpinner()}
style={{ flex: 1 }}
/>

{this.state.visible && (
<ActivityIndicator
style={{
flex: 1,
left: 0,
right: 0,
top: 0,
bottom: 0,
position: "absolute",
alignItems: "center",
justifyContent: "center",
}}
size="large"
/>
)}
</View>
);
}
}

const styles = StyleSheet.create({
container: {
flex: 1,
},
});

Friday, July 10, 2020

Thread dump analysis case on weblogic..

First get the TDA or the visual vm plugin for TDA or that ibm thread analyzer...

Look for the worker threads .. for now leave daemon threads aside... 
Look for threads which are locking monitors and look for threads which are waiting for monitors...

If you find some concurrent util locks or synchronizers or abstract  queue syncronizers in the free monitors list.. 
i mean monitors are free but threads are waiting to acquire it... it means the jvm parameter is not enabled to print

  • ion -XX:+PrintConcurrentLock


Look here , there are no locks on monitors but still threads are waiting.. for monitors... that means the above parameter is not enabled...
Every object have monitors so that threads in queue can get lock on them and operate on them.. 

so ,here we need to enable parameters and find out which are these objects and who is acquiring the lock on them....


l

Thursday, July 9, 2020

Debug React app on VSCode

Start server side with 
node --inspect server.js 

debugger will listen on 9229 ..

Create a launch.json for debug
==========

{
// Use IntelliSense to learn about possible attributes.
// Hover to view descriptions of existing attributes.
// For more information, visit: https://go.microsoft.com/fwlink/?linkid=830387
"version": "0.2.0",
"configurations": [
{
"name": "Launch Chrome",
"request": "launch",
"type": "pwa-chrome",
"url": "http://localhost:8015",
"webRoot": "${workspaceFolder}"
},
{
"name": "Attach",
"port": 9229,
"request": "attach",
"skipFiles": [
"<node_internals>/**"
],
"type": "pwa-node"
}
]
}
======================

To do front end debug... install chrome ext on vscode.
start your front end via the npm start or check package.json for run scripts.
Use the above configuration 
It will launch a chrome on 8015. also make sure your front end is started on 8015

...time to debug... you should see breakpoints hitting.... 
you can also add debugger;  in your code , its same as a breakpoint..
var i = "helo";
debugger;                <============== Break point will be activated here...
console.log('value is ' +i) 


Friday, April 24, 2020

Simplest netcat


Receiver
nc -l -p 1234 -q 1 > something.zip < /dev/null
Sender
cat something.zip | netcat server.ip.here 1234

Tuesday, April 21, 2020

VScode and GIT setup

git config --global user.email "email@example.com"
git config --global user.name "name"

#Password prompt issue fix

git config --global credential.helper cache

git config --global credential.helper 'cache --timeout=360000'     // 100 hours 

Saturday, April 18, 2020

Debug bash in VScode and pass variables in launch.json

{
// Use IntelliSense to learn about possible attributes.
// Hover to view descriptions of existing attributes.
// For more information, visit: https://go.microsoft.com/fwlink/?linkid=830387
"version": "0.2.0",
"configurations": [
{
"type": "bashdb",
"request": "launch",
"name": "Bash-Debug (simplest configuration)",
"program": "${file}",
"terminalKind": "external",
"args":"start"
}
]
}

Sunday, April 5, 2020

Run jupyter on ubuntu 18

dont do apt install jupyter

go with pip3 install jupyter 

pip3 install pandas if require pandas on jupyter notebook

Friday, February 7, 2020

Encrypt decrypt via public key

Generate keys
openssl genrsa -out key.pem
openssl rsa -in key.pem -out key.pub -pubout

# Encrypt and Decrypt a file (using public key to encrypt)
echo --pass-- > pass.txt
openssl rsautl -in pass.txt -out pass.enc -pubin -inkey key.pub -encrypt
openssl rsautl -in pass.enc -out pass.dec -inkey key.pem -decrypt
cat pass.dec

# Compress, Encrypt, Decyrpt, Uncompress a file (using password in pass.txt)
echo content > file.txt
gzip file.txt
openssl bf -in file.txt.gz -out file.enc -pass file:pass.txt -e
openssl bf -in file.enc -out file.dec.gz -pass file:pass.dec -d
gzip -d file.dec.gz
cat file.dec

Friday, January 10, 2020

kali stuck on boot

if kali starts giving weird kernel panic or the logo doesnt go away
or the blinking cursor.

first try the grub  edit by pressing e button on boot.

remove the splash and let it boot in quiet mode.
try to get the shell via ctrl f 2/3 if doesnt work . 


try to go advanced mode  of the kali .and try rescue mode
refer stack overflow on how to fix the corrupted file system.

if not able to land on command line do the below


=========================
download kali live lite iso 

add it as an optical drive to virtual box
change boot order. 
boot to kali lite iso live cd .
go to terminal and 
mount the corrupted sda partition on the live cd 

find the partition via df or there is an icon on desktop just
mount the volume. 
now once you have the file system access of the corrupted vdi

sudo apt-get -o Dir=/media/partitioni1 update

partition above  is the random number you saw on df 
something like /media/asdfasd

if face any error,try to copy  files from local file system to the target file system. 

if there are missing files and kernel is panicking because of that try to paste 
those shared objects or files.

once pasted try to go root on the partition 

chroot /media/partition sdfsdfsd

dpkg --root=/mnt/partition1 -i mypackage.deb

if a package is corrupted try to install it manually , download the deb offline. 
#kalibootstuck # kalinotbooting